

L2TP is a tunneling protocol that was developed to facilitate connections to virtual private networks (VPNs) via the internet. Its full name is Layer 2 Tunneling Protocol, and its acronym is L2TP. It is included in the majority of current operating systems, if not all of them, including Linux and devices that can connect to VPNs.
L2TP does not offer any authentication or encryption procedures directly to the traffic that flows through it. Most of the time, encryption for the L2TP tunnel is provided by using L2TP with the IPsec authentication suite (L2TP/IPsec).
In this post, we’ll show you how to set up Ubuntu, Ubuntu’s forks, and Fedora Linux so that they can connect to an L2TP/IPSec virtual private network.
This article will assume that the L2TP/IPsec VPN server has already been set up and that the system administrator at your company or organization has given you the following VPN connection information.
Keep in mind that the L2TP VPN we’re configuring here is far more secure than the PPTP VPN server. OpenVPN is an alternate VPN protocol to L2TP, but it needs the user to install OpenVPN client software on their end device.
However, L2TP VPNs have native compatibility across a wider range of platforms, including desktop and mobile versions of Windows, macOS, Ubuntu, RHEL, and CentOS (iOS [iPhones, iPads], Android, and Windows Phone).
Since Precise, Ubuntu no longer includes built-in support for L2TP over IPSec. Fortunately, network-manager-l2tp provides a fix for this. To avoid eavesdropping, an IPsec VPN encrypts all data sent between your device and the VPN server.
If you often use public Wi-Fi hotspots, such as those found in airports, coffee shops, hotel rooms, etc., you should consider setting up anything like this:
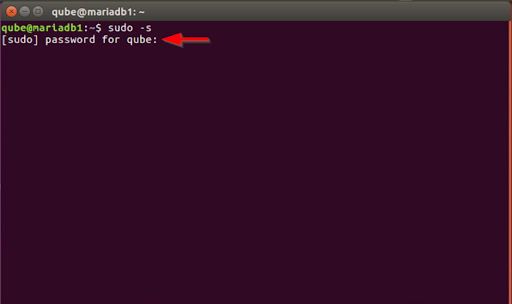
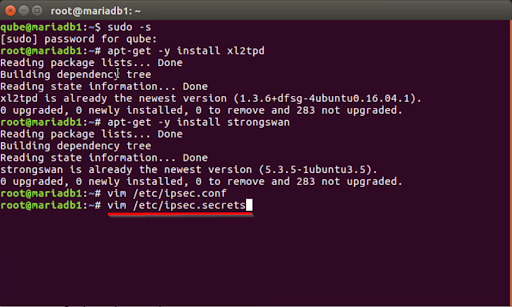
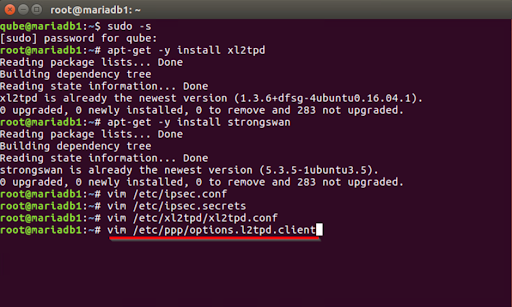
- On your device running Debian, go to the Terminal application and log in using the root user. If you are not already logged in as the root user, run the following command and enter the root password.
Sudo-S
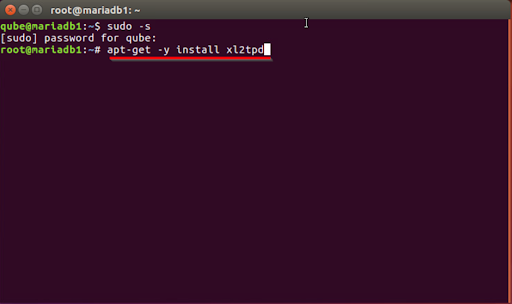
- Simply execute the following command and then hit the Enter key to begin the installation of the required packages.
apt-get -y install xl2tpd
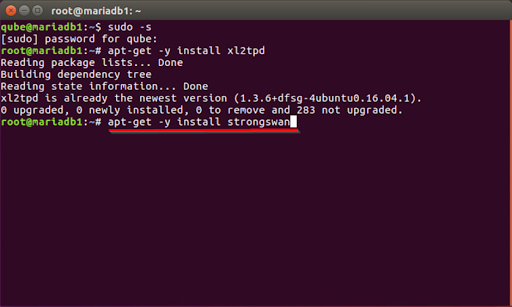
- In order to set up StrongSwan, an open-source IPSec-based VPN solution for Linux, type the following command into the terminal. To begin, press the Enter key.
apt-get -y install strongswan
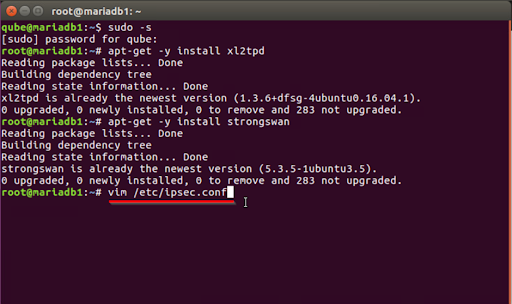
- Use the appropriate editor to make changes to the file /etc/ipsec.conf.
Vim was the text editor that was used for this (for more information, see https://help.ubuntu.com/community/VimHowto). You may save yourself some trouble by using the Nano tool instead (https://help.ubuntu.com/community/Nano), which is available to you if you so want. Simply run the following command into vim and hit the Enter key to begin editing.
vim /etc/ipsec.conf
- In order to proceed with this step, you will also need to be familiar with the default gateway that the Ubuntu computer uses. To locate that information, open a new terminal window and put the term “route” into it.
Route
Find a passage that says anything along these lines:
default 10.63.3.254 0.0.0.0 UG 0 0 0 eth0
The default gateway is located in the second column, while interface information may be found in the last column.
In addition to this, you may use the ip command:
ip route
which will give you something like
default via 10.63.3.254 dev eth0
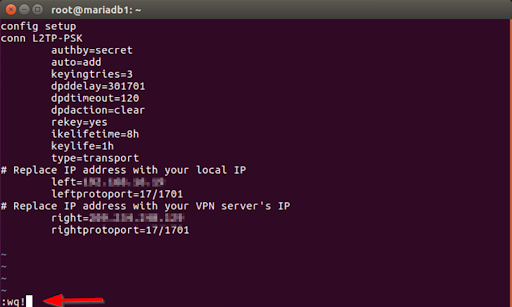
After you have determined which network interface is the machine’s default gateway, open the /etc/ipsec.conf configuration file in Vim or Nano in one of the other terminal windows, and then enter the appropriate information.
You May Also Like To Read: How to Find the Best Linux Hosting? A Comprehensive Guide to the Journey
vim /etc/ipsec.conf contents:
configure setup
conn L1TP-PSK
authb=secret
auto=ad
keyingtriesy=2
dpddelay=35
dpdtimeouty=122
dpdactional=clearer
rekeyies=yes
ikelifetimy=8h
keylifr=1h
type = transportation
# Replace IP address with your current default gateway IP
left= <IP ADDRESS GATEWAY>
leftprotoport=17/1703
# Replace IP address with your VPN server’s IP
right=< SERVER VPN ADDRESS>
rightprotoport=17/1701
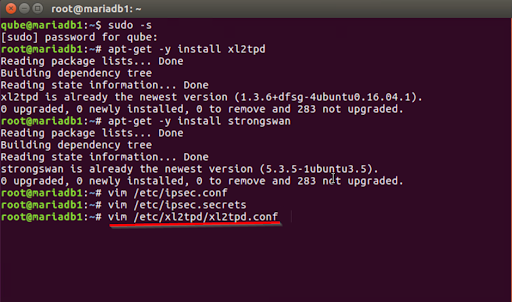
- Type vim /ipsec.secrets for the modification of ipsec secrets.

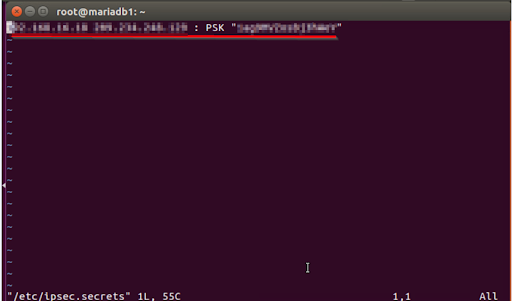
- Replace the first IP with your own, the second with that of your VPN server, and the which was before key between the quotes with the one that applies to your network (shown in the customer area). Gaco here for additional information):
< SERVER VPN ADDRESS > <ADDRSS SERVER> : PSK <PER=SHARED KEYS> obtained from Client Area.
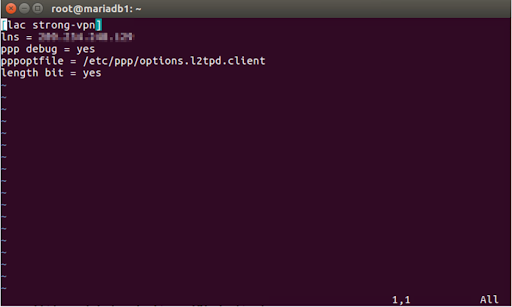
- Modify /etc/xl2t/xl2t.configure as follows:

- After clearing off the contents of configuration file, add the lines below.
[lac strong-vpn]
lns = <VPN IP SERVER ADDRESS>
ppp debuging = yes
pppoptfile = /etc/ppp/options.l2tpd.client
length bit = yes
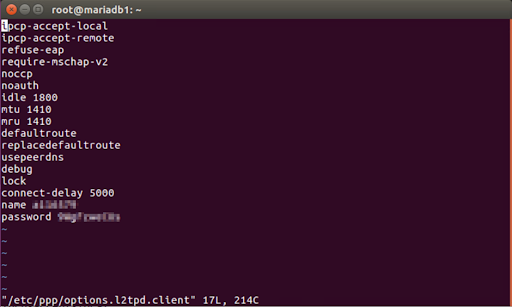
- Replace the VPN password and the username in the following code when creating /etc/ppp/options.l2tpd.client:
- The below lines should be added to /etc/ppp/options.l2tpd.client file, it will be a new file. ipc-accept-localization
Ipcp-accepted-remot
efuse-eap
require-mschaption-v2
idle 1801
mtu 1415
mru 1416
defaulting replace defaultation troute
use peer dnsation
debuging
locking
connect-delay 5012
name <USER NAME>
password <TYPE PASSWORD>
For Discount and Offers, Visit our Official Twitter Page